Layout merupakan suatu tampilan tata letak di Android untuk mengatur penempatan teks, gambar, ataupun komponen lainnya sehingga tampilan pada aplikasi yang dibuat terlihat rapih dan nyaman untuk dilihat oleh pengguna.
Jenis-jenis dan fungsi Layout
Ada 5 jenis layout pada android studio yang bisa digunakan untuk merancang tampilan aplikasi semenarik mungkin. Layout-layout tersebut antara lain :
- Linear Layout
- Relative Layout
- Table Layout
- Grid Layout
- Frame Layout
- Constaint Layout
1. Linear Layout
Dengan menggunakan Linear Layout setiap komponen atau elemen (child view-nya) yang akan digunakan untuk merancang aplikasi android disejajarkan dalam satu arah saja, yaitu secara horizontal atau vertical.
Tag pembuka dari Linear Layout adalah < LinearLayout > dan tag akhirannya yaitu </LinearLayout>. Untuk menentukan horizontal atau vertical tag atau atribut yang dipakai yaituandroid:orientation.

Semua anak Linear Layout akan ditumpuk satu sama lain, jadi daftar vertikal hanya akan memiliki satu anak perbaris, berapa pun lebarnya dan daftar horizontal hanya akan setinggi satu baris (tinggi anak yang tertinggi, ditambah pengisi). Linear Layout akan mengikuti margin antara anak dan gravity (sejajar kanan, tengah, atau kiri) setiap anak.
Contoh Linear Layout :
<?xml version="1.0" encoding="utf-8"?>
<LinearLayout
    xmlns:android="http://schemas.android.com/apk/res/android"
    android:layout_width="match_parent"
    android:layout_height="match_parent"
    android:paddingLeft="16dp"
    android:paddingRight="16dp"
    android:orientation="vertical" >
    <TextView
        android:id="@+id/textView"
        android:layout_width="match_parent"
        android:layout_height="62dp"
        android:text="Form dengan Linear Layout"
        android:textAlignment="center" />
    <EditText
        android:layout_width="match_parent"
        android:layout_height="wrap_content"
        android:hint="password" />
    <EditText
        android:layout_width="match_parent"
        android:layout_height="0dp"
        android:layout_weight="1"
        android:gravity="top"
        android:hint="isi pesan" />
    <Button
        android:layout_width="100dp"
        android:layout_height="wrap_content"
        android:layout_gravity="right"
        android:text="next" />
</LinearLayout>
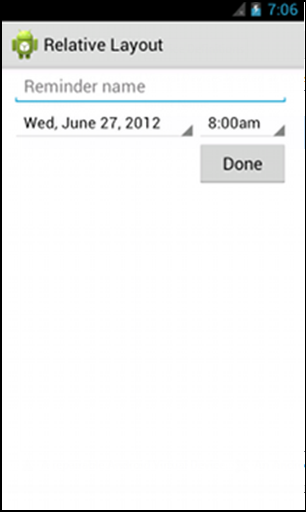
Hasilnya :

2. Relative Layout
Relative Layout merupakan layout yang bisa dipakai untuk mengatur widget atau komponen aplikasi android secara relative (bebas), tidak sebatas vertical atau horizontal saja.
Setiap komonen bisa ditentukan posisinya secara relative (bebas), seperti dibagian bawah, kiri, atas, dan tengah. Tag pembuka RelativeLayout yaitu <RelativeLayout> dan penutupnya </RelativeLayout>.

Contoh Relative Layout :
<?xml version="1.0" encoding="utf-8"?>
<RelativeLayout xmlns:android="http://schemas.android.com/apk/res/android"
    android:layout_width="match_parent"
    android:layout_height="match_parent"
    android:paddingLeft="16dp"
    android:paddingRight="16dp" >
    <EditText
        android:id="@+id/name"
        android:layout_width="match_parent"
        android:layout_height="wrap_content"
        android:hint="@string/reminder" />
    <Spinner
        android:id="@+id/dates"
        android:layout_width="0dp"
        android:layout_height="wrap_content"
        android:layout_below="@id/name"
        android:layout_alignParentLeft="true"
        android:layout_toLeftOf="@+id/times" />
    <Spinner
        android:id="@id/times"
        android:layout_width="96dp"
        android:layout_height="wrap_content"
        android:layout_below="@id/name"
        android:layout_alignParentRight="true" />
    <Button
        android:layout_width="96dp"
        android:layout_height="wrap_content"
        android:layout_below="@id/times"
        android:layout_alignParentRight="true"
        android:text="@string/done" />
</RelativeLayout>
3. Table Layout
Table Layout adalah Layout yang digunakan untuk membangun user interface (tampilan antar muka) aplikasi android dengan berdasarkan Baris dan Kolom.
Table Layout berfungsi untuk menampilkan elemen-elemen view berdasarkan posisi kolom dan baris. Penggunaannya hampir sama dengan HTML yaitu memakai tag <table> dan <tr> serta <td>.
Table Layout terdiri dari:
- Row/ baris pada dasarnya digunakan untuk menyimpan satu jenis record, hanya satu informasi yang dapat disimpan.
- Kolom adalah sub bagian terbagi dari setiap baris dan satu baris dapat menampung beberapa jenis kolom. Setiap kolom terdiri dari jenis informasi yang berbeda mengenai baris tersebut.Tag Table Layout
Beberapa tag pada Table Layout :
- <TableLayout> : Tag pembuka untuk menggunakan TableLayout, </TableLayout> : Tag penutup untuk menggunakan TableLayout
- <TableRow> : Tag pembuka untuk membuat Baris, </TableRow> : Tag penutup untuk membuat Baris
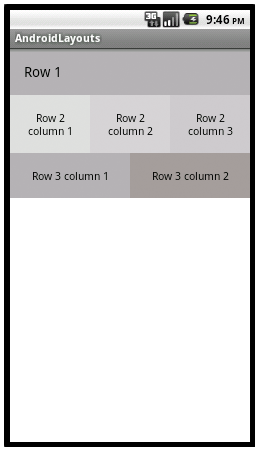
Contoh Table Layout :
<TableLayout
    xmlns:android="http://schemas.android.com/apk/res/android"
    android:layout_width="match_parent"
    android:layout_height="match_parent"
    android:shrinkColumns="*"  android:stretchColumns="*" android:background="#ffffff">
    <!-- Row 1 with single column -->
    <TableRow
        android:layout_height="wrap_content"
        android:layout_width="fill_parent"
        android:gravity="center_horizontal">
        <TextView
            android:layout_width="match_parent" android:layout_height="wrap_content"
            android:textSize="18dp" android:text="Row 1"  android:layout_span="3"
            android:padding="18dip" android:background="#b0b0b0"
            android:textColor="#000"/>
    </TableRow>

    <!-- Row 2 with 3 columns -->
    <TableRow
        android:id="@+id/tableRow1"
        android:layout_height="wrap_content"
        android:layout_width="match_parent">
        <TextView
            android:id="@+id/TextView04" android:text="Row 2 column 1"
            android:layout_weight="1" android:background="#dcdcdc"
            android:textColor="#000000"
            android:padding="20dip" android:gravity="center"/>
        <TextView
            android:id="@+id/TextView04" android:text="Row 2 column 2"
            android:layout_weight="1" android:background="#d3d3d3"
            android:textColor="#000000"
            android:padding="20dip" android:gravity="center"/>
        <TextView
            android:id="@+id/TextView04" android:text="Row 2 column 3"
            android:layout_weight="1" android:background="#cac9c9"
            android:textColor="#000000"
            android:padding="20dip" android:gravity="center"/>
    </TableRow>

    <!-- Row 3 with 2 columns -->
    <TableRow
        android:layout_height="wrap_content"
        android:layout_width="fill_parent"
        android:gravity="center_horizontal">
        <TextView
            android:id="@+id/TextView04" android:text="Row 3 column 1"
            android:layout_weight="1" android:background="#b0b0b0"
            android:textColor="#000000"
            android:padding="20dip" android:gravity="center"/>

        <TextView
            android:id="@+id/TextView04" android:text="Row 3 column 2"
            android:layout_weight="1" android:background="#a09f9f"
            android:textColor="#000000"
            android:padding="20dip" android:gravity="center"/>
    </TableRow>

</TableLayout>
Hasil :
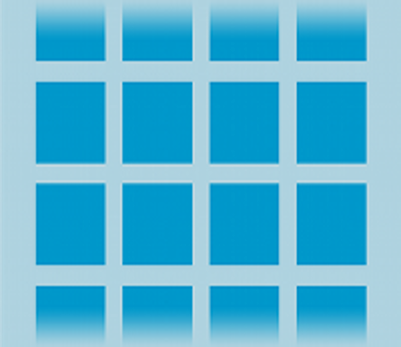
4. Grid Layout
Layout yang berfungsi untuk menampilkan elemen-elemen view berdasarkan posisi kolom dan baris tetapi dilengkapi dengan aplikasi scollview. Biasanya digunakan untuk penyimpanan seperti galeri.
5. Frame Layout
Frame Layout adalah Layout yang biasanya digunakan untuk membuat objek yang saling bertindihan contohnya yaitu kita membuat button di atas image. Untuk lebih jelasnya lihat contoh dibawah :
<?xml version="1.0" encoding="utf-8"?>
<FrameLayout xmlns:android="http://schemas.android.com/apk/res/android"
    android:layout_width="match_parent"
    android:layout_height="match_parent"
    android:background="#1113">

    <ImageView
        android:layout_width="300dp"
        android:layout_height="300dp"
        android:layout_gravity="center"
        android:background="@color/colorPrimary"

         />

    <Button
        android:layout_width="300px"
        android:layout_height="100px"
        android:layout_gravity="center"
        android:text="Tombol"
        android:background="@color/colorAccent"
        android:textColor="#fff"
        android:textSize="20sp" />
</FrameLayout>
Hasilnya :
.
6. Constaint Layout
Sebenarnya Constraint Layout mirip dengan Relative Layout, karena letak View bergantung pada View lain dalam satu Layout ataupun dengan Parent Layoutnya. Contohnya di Relative Layout kita bisa meletakkan sebuah View di atas, bawah, atau samping View lain. Kita juga dapat mengatur posisinya berdasarkan Parent Layout menggunakan tag seperti centerVertical, alignParentBottom, dan lain-lain. Akan tetapi, Constraint Layout jauh lebih fleksibel dan lebih mudah digunakan di Layout Editor.
Pada Constraint Layout, setiap View memiliki tali (Constraint) yang menarik tiap sisinya, yang mana tali tersebut bisa kita atur Elastisitas, Margin, dan sebagainya. Tali tersebut wajib kita “ikatkan” kepada anchor point atau suatu titik yang dapat berupa sisi dari Parent Layout, View lain, ataupun titik bantu (helper) yang bisa kita buat sendiri.
<?xml version="1.0" encoding="utf-8"?>
<android.support.constraint.ConstraintLayout
        xmlns:android="http://schemas.android.com/apk/res/android"
        xmlns:tools="http://schemas.android.com/tools"
        xmlns:app="http://schemas.android.com/apk/res-auto"
        android:layout_width="match_parent"
        android:layout_height="match_parent"
        android:background="@drawable/bggradient"
        tools:context=".MainActivity">

    <android.support.v7.widget.CardView
            android:layout_width="300dp"
            android:layout_height="50dp"
            app:layout_constraintEnd_toEndOf="parent"
            app:layout_constraintStart_toStartOf="parent"
            app:layout_constraintBottom_toBottomOf="parent"
            app:cardCornerRadius="15dp"
            app:cardElevation="20dp"
            android:id="@+id/cardView"
            app:cardBackgroundColor="@color/colorAccent"
            android:layout_marginBottom="50dp">
        <android.support.constraint.ConstraintLayout
                android:layout_width="match_parent"
                android:layout_height="match_parent">

            <TextView
                    android:text="Login"
                    android:layout_width="wrap_content"
                    android:layout_height="wrap_content"
                    app:layout_constraintTop_toTopOf="parent"
                    app:layout_constraintStart_toStartOf="parent"
                    android:layout_marginTop="16dp"
                    app:layout_constraintEnd_toEndOf="parent"
                    android:id="@+id/textView"
                    android:layout_marginBottom="8dp"
                    app:layout_constraintBottom_toBottomOf="parent"
                    app:fontFamily="sans-serif"
                    android:textColor="@android:color/background_light"
                    android:textSize="24sp"
                    app:layout_constraintVertical_bias="1.0"/>
        </android.support.constraint.ConstraintLayout>
    </android.support.v7.widget.CardView>
    <android.support.v7.widget.CardView
            android:layout_width="320dp"
            android:layout_height="400dp"
            app:layout_constraintStart_toStartOf="parent"
            app:layout_constraintEnd_toEndOf="parent"
            app:layout_constraintTop_toTopOf="parent"
            android:layout_marginTop="8dp"
            android:layout_marginBottom="8dp"
            app:layout_constraintBottom_toTopOf="@+id/cardView"
            app:cardCornerRadius="15dp"
            app:cardElevation="20dp"
            app:layout_constraintVertical_bias="0.781"
            android:id="@+id/cardView2">
        <android.support.constraint.ConstraintLayout
                android:layout_width="match_parent"
                android:layout_height="match_parent">

            <ImageView
                    android:layout_width="150dp"
                    android:layout_height="150dp"
                    app:srcCompat="@drawable/logo"
                    app:layout_constraintStart_toStartOf="parent"
                    app:layout_constraintEnd_toEndOf="parent"
                    android:id="@+id/imageView"
                    android:layout_marginTop="36dp"
                    app:layout_constraintTop_toTopOf="parent"
                    android:layout_marginBottom="8dp"
                    app:layout_constraintBottom_toBottomOf="parent"
                    app:layout_constraintVertical_bias="0.0"/>
            <android.support.design.widget.TextInputLayout
                    android:layout_width="300dp"
                    android:layout_height="wrap_content"
                    app:layout_constraintStart_toStartOf="parent"
                    app:layout_constraintEnd_toEndOf="parent"
                    android:id="@+id/textInputLayout2"
                    app:layout_constraintTop_toBottomOf="@+id/imageView"
                    android:layout_marginTop="50dp"
                    style="@style/Widget.MaterialComponents.TextInputLayout.OutlinedBox"
                    app:passwordToggleTint="@color/colorAccent">

                <android.support.design.widget.TextInputEditText
                        android:layout_width="match_parent"
                        android:layout_height="wrap_content"
                        android:hint="Email"
                        android:inputType="textEmailAddress"/>
            </android.support.design.widget.TextInputLayout>
            <android.support.design.widget.TextInputLayout
                    android:layout_width="300dp"
                    android:layout_height="wrap_content"
                    app:layout_constraintEnd_toEndOf="parent"
                    android:layout_marginBottom="16dp"
                    app:layout_constraintStart_toStartOf="parent"
                    app:layout_constraintBottom_toBottomOf="parent" android:id="@+id/textInputLayout3"
                    android:layout_marginTop="8dp"
                    app:layout_constraintTop_toBottomOf="@+id/textInputLayout2"
                    style="@style/Widget.MaterialComponents.TextInputLayout.OutlinedBox"
                    app:passwordToggleTint="@color/colorAccent">

                <android.support.design.widget.TextInputEditText
                        android:layout_width="match_parent"
                        android:layout_height="wrap_content"
                        android:hint="Password"
                        android:inputType="textPassword"/>
            </android.support.design.widget.TextInputLayout>
        </android.support.constraint.ConstraintLayout>
    </android.support.v7.widget.CardView>
</android.support.constraint.ConstraintLayout>
Hasilnya :

Referensi :
- https://developer.android.com/guide/topics/ui?hl=id
- https://www.codepolitan.com/mempelajari-layout-pada-android-studio
- https://badoystudio.com/layout-android-studio/
- https://www.androidhive.info/2011/07/android-layouts-linear-layout-relative-layout-and-table-layout/

Be the first to comment